Introducing the new Parallels RAS User Portal: a more intuitive experience for end users
The Parallels RAS User Portal has undergone a transformative user interface update, promising a more intuitive and visually stunning experience than ever before!
Version 19.3 of Parallels RAS boasts a brand-new User Portal interface, making it easier than ever for end users to access their apps, desktops, and data.
This blog post focuses on the enhanced capabilities that the new User Portal contains, helps organizations prepare for the change, and guides end-users to make the transition and get the most out of the new user portal.
When accessing the User Portal after the upgrade to 19.3, the end user will be presented with a significantly changed interface, providing a modern look and feel as shown below.
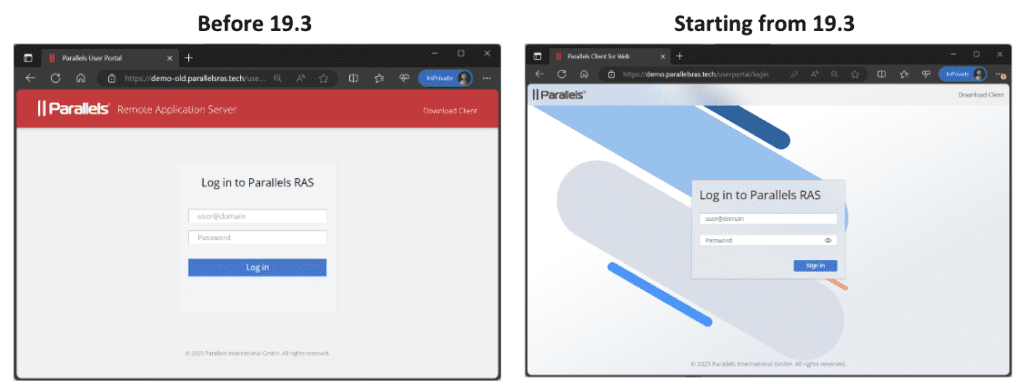
The upcoming sections of this blog post focus on all the new capabilities introduced and illustrate how day-to-day tasks are performed within the new user experience.
The new User Portal still supports any modern web browser supporting HTML5, such as Microsoft Edge (Chromium-based), Google Chrome, Mozilla Firefox, Safari, and similar.
Ready to get started with the new User Portal and more? Get a full-featured 14 day free trial of Parallels RAS now.
New App Launcher as the convenient place to access all resources
Launching applications has undergone a significant improvement. Working with tabs, favorites, search, and the sidebar control now provides a modern and efficient user experience.
Using the All Apps section
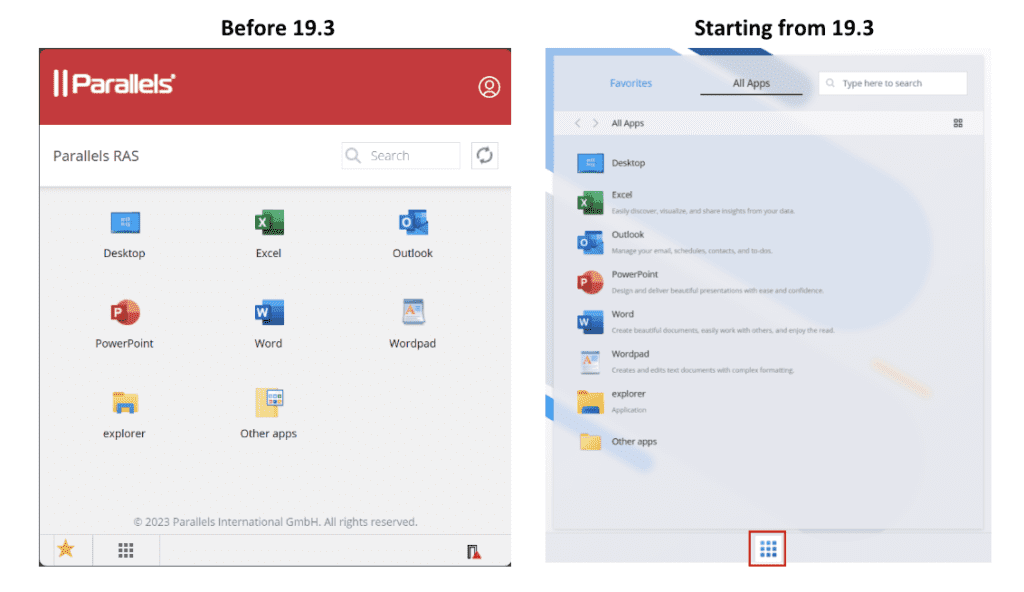
Once logged on, the new All Apps section appears immediately. You can also bring up the All Apps tab at any time using the launcher button, centrally located at the bottom of the user portal as highlighted on the right in the screenshots below.
From here, you have access to the All Apps tab, Favorites, and Search.
The All Apps tab contains all published applications, desktops, files and folders that the user has access to. This can be a mix of resources published on-premises, from multiple Public Cloud providers, and Azure Virtual Desktop, all easily accessible from the same interface.
Optionally, descriptions can be used to easily distinguish between published items with the same name and icon. The table below shows the previous interface on the left and the new and improved interface on the right.
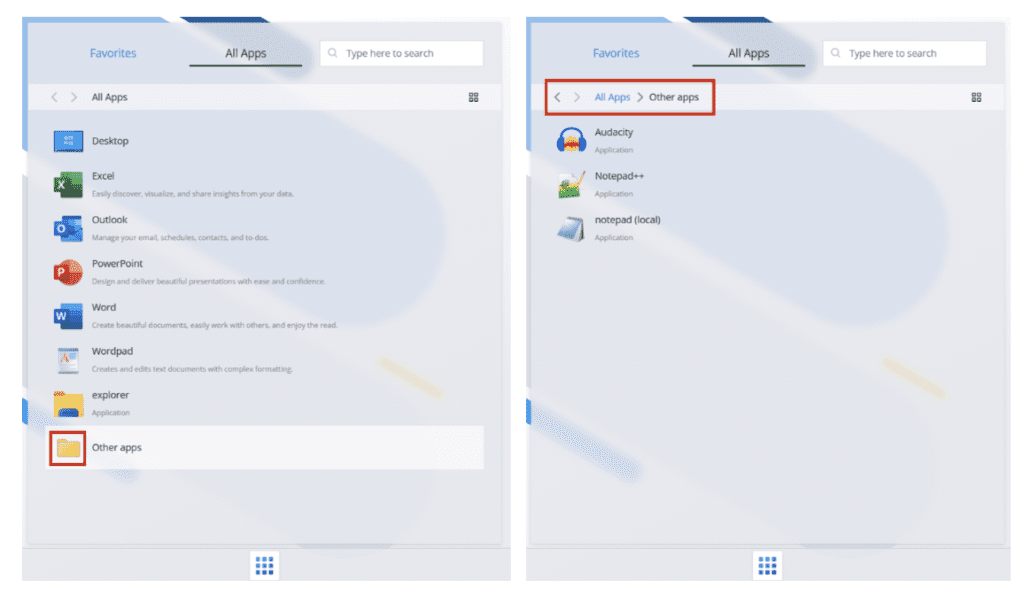
An administrator is able to organize published resources using folders to help users to navigate more intuitively.
Inside the User Portal subfolders are identified with a folder icon, which the administrator can customize, as shown below on the left-hand side.
The user Portal provides convenient breadcrumbs to allow for easy and fast navigation in subfolders, as shown on the right-hand side.
Working with favorites
Setting favorites allows end users to create a subset of the published resources that they have access to and use the most frequently. This is especially convenient if the end user has access to a large number of published items and wants to avoid excessive scrolling and searching when trying to find the application or desktop they want to launch. Setting published resources as favorites is easy and only requires a single click.
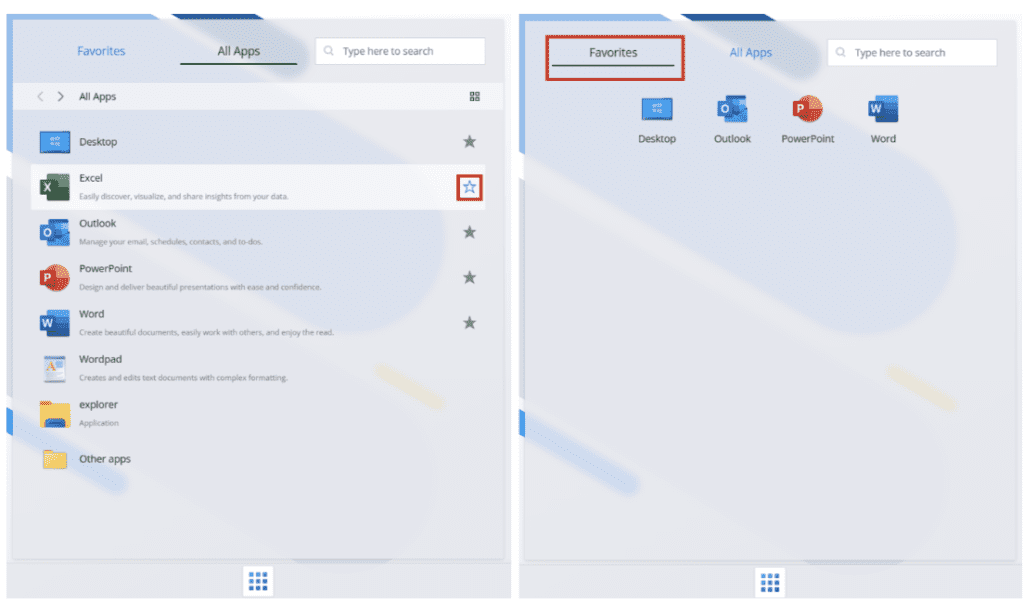
Simply click on the starred icon of any published resource as shown below on the left-hand side. Every resource marked as a favorite is indicated by a starred icon. The screenshot below shows how favorites were accessed with the previous version by selecting the ‘star’ icon at the bottom of the portal window.
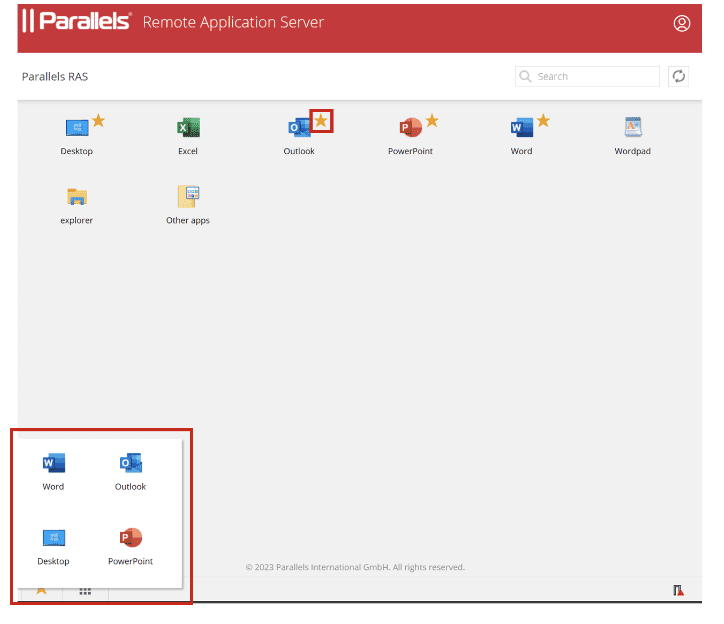
Starting from Parallels RAS 19.3, favorites are stored in a dedicated tab, providing more space to store a larger number of favorites and allowing for easier navigation.
To access the favorites tab, click in the upper-left corner, as shown below in the screenshot on the right.
Once opened, the user has instant access to a subset of published items and can easily launch their most often used resources.
To remove a resource from the favorites section, simply click the starred icon in the All Apps section again.
Favorites are stored centrally and persist with the user for all clients released from 19.3 onwards — not just the User Portal. This means that regardless of the device or browser being used to access the User Portal, , the same favorites list will appear.
Working with app listing in the list view
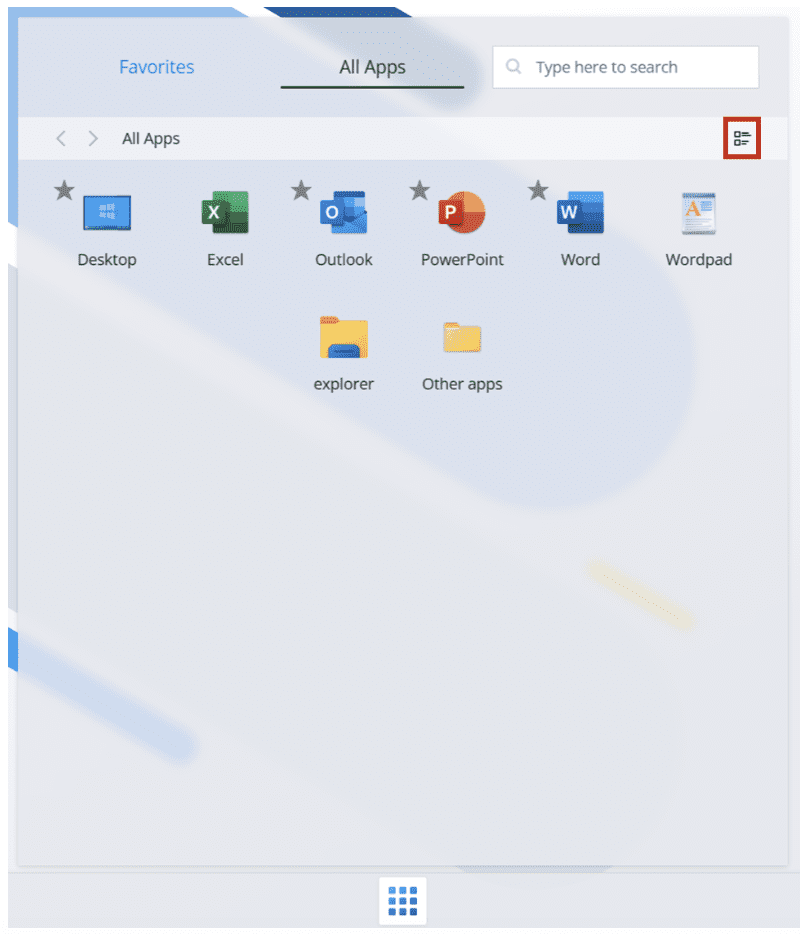
With the release of Parallels RAS version 19.3, items in the All Apps section can appear in a list view. This means that all resources are shown in a single list with a visible icon, name, and description. Users are also able to switch between list view and icon view, using the toggle button as shown below. The favorites section is always based on an icon view.
Searching capabilities
The more resources are assigned to an end user, the more challenging it can be to find a specific resource; for example, when that resource is not already added to the favorites section.
The new User Portal empowers end users with the ability to search.
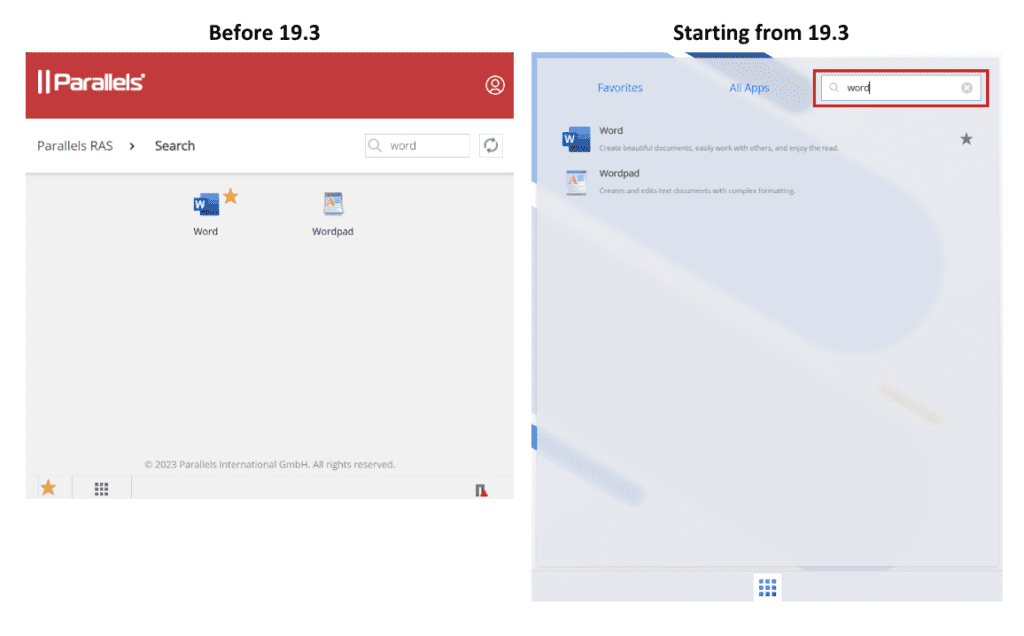
At any time, end users can click on the search box in the upper right corner. As they start typing items that match the search results will immediately start appearing. This makes searching fast and easy.
The search will always return all matching search terms found in the All Apps section, including items within any sub-folder, regardless of whether the currently opened tab is All Apps or Favorites. The new search capabilities are illustrated in the screenshots below.
Using the side-bar control panel
Once a session is active, the new sidebar control panel appears. The sidebar offers quick and easy access for users to exchange files between local and remote sessions, perform clipboard operations, and (new in version 19.3) view session telemetry information.
When a published desktop session is launched, the new sidebar can also be used to switch to and from full screen offering a great user experience. See how the new sidebar looks in Parallels RAS 19.3 below.
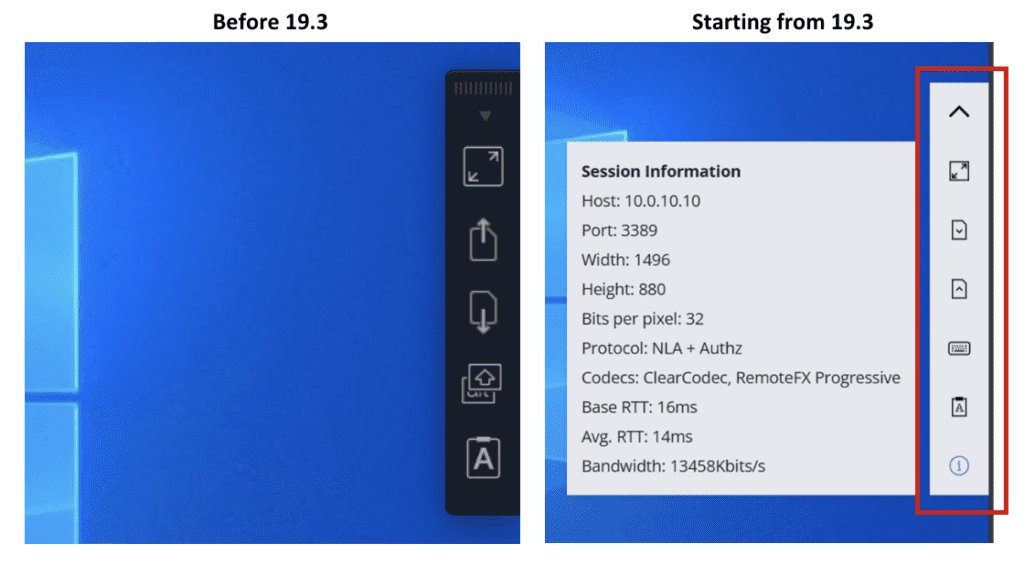
The session information is new functionality added in version 19.3. Its primary use case is allowing administrators to gain insights into session telemetry information, enabling them to better troubleshoot performance issues.
Profile menu with increased efficiency with the new organized settings
After logging in you have access to a profile menu containing quick links to various tasks. This menu can be accessed by clicking on the profile icon in the top right corner.
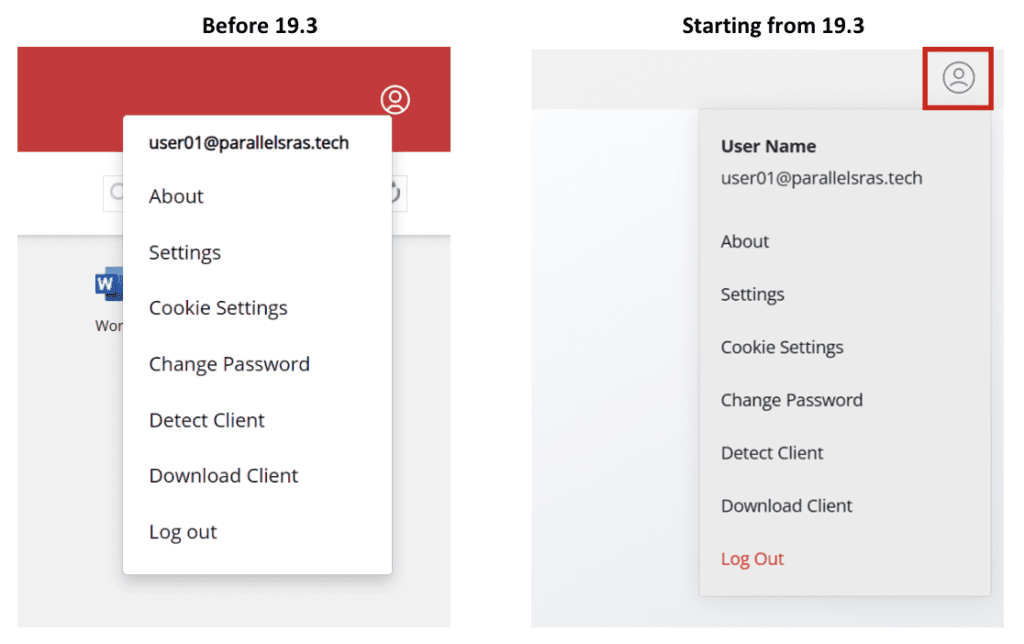
The About option provides generic information about the product including the version and build number that is installed.
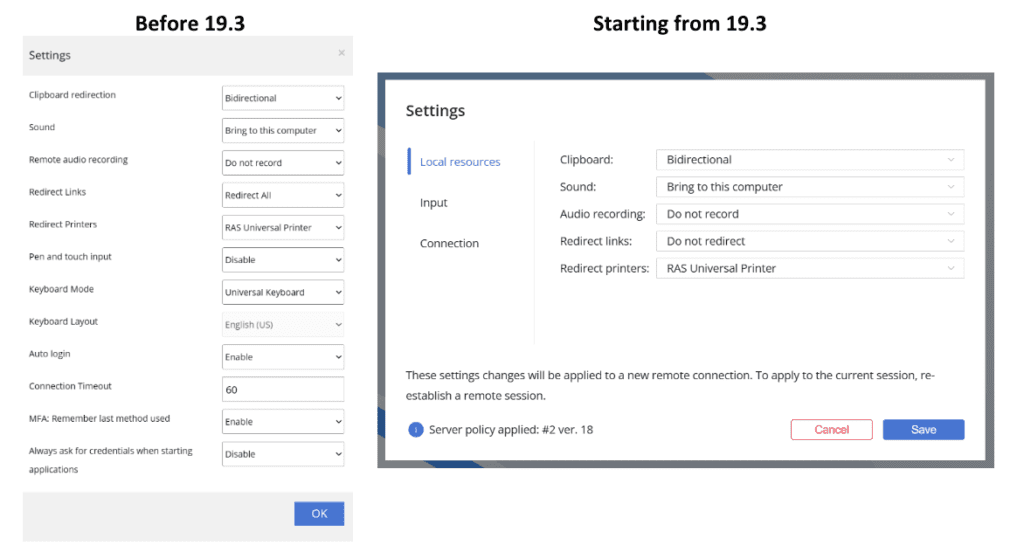
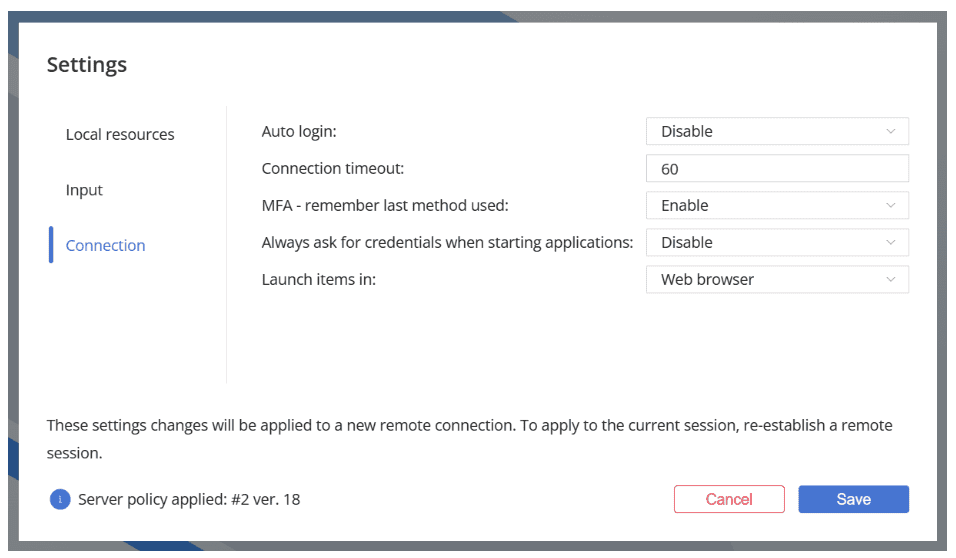
The Settings option provides access to a newly organized settings screen as shown below. This provides the ability to change the redirection of local resources, change input settings related to keyboard and touch, and customize the connection properties such as auto-login and connection timeouts.
An organization can opt to manage the control of these settings centrally, or to allow users to adjust these settings themselves. The settings dialog has been split and reorganized into different sections, allowing end users to find various options more efficiently.
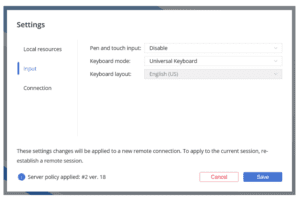
The screenshots below show the other two tabs used to change Input settings and Connection settings.
The Cookie Settings section enables users to modify the way the user portal handles browser cookies.
The Change Password option is used to change one’s password at any time via the User Portal.
The Detect client option can be used to trigger the detection of the Parallels Client, as well as selecting the option to use the web client. The underlying process of detecting the installed client has significantly improved. These changes are explained in the following section.
Simplified and efficient client detection
The User Portal can detect if the Parallels client that corresponds to the client operating system is installed. Clients are available for Windows, MacOS, Linux (various distributions), iOS, and Android.
The user experience of detecting if a Parallels RAS Client is installed has significantly been improved and the steps to install the Parallels Client in case it is not detected have been simplified. In addition, more logic has been added by showing a recommendation to install the Parallels Client, but still allowing to use the web browser instead.
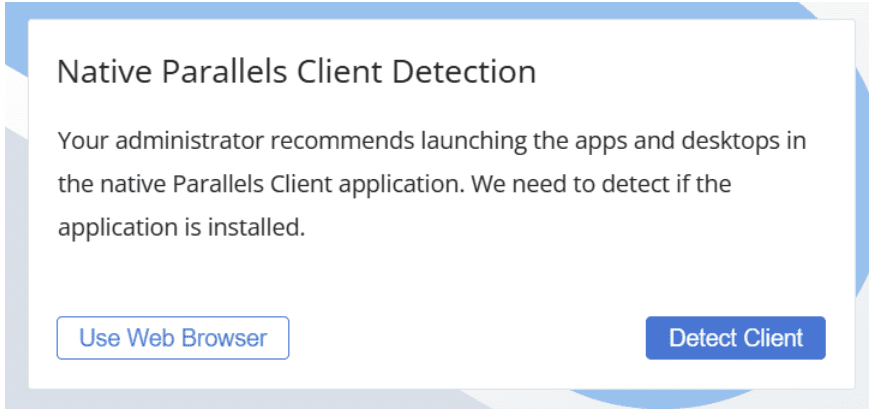
There are two main ways to launch resources published through Parallels RAS. A native client can be used on desktop and mobile devices and User Portal can be used to access applications and desktops from a webpage.
As an administrator, you can determine how applications are launched when using the User Portal. The table below shows the options that an administrator can specify and in which cases detection of the client is required.
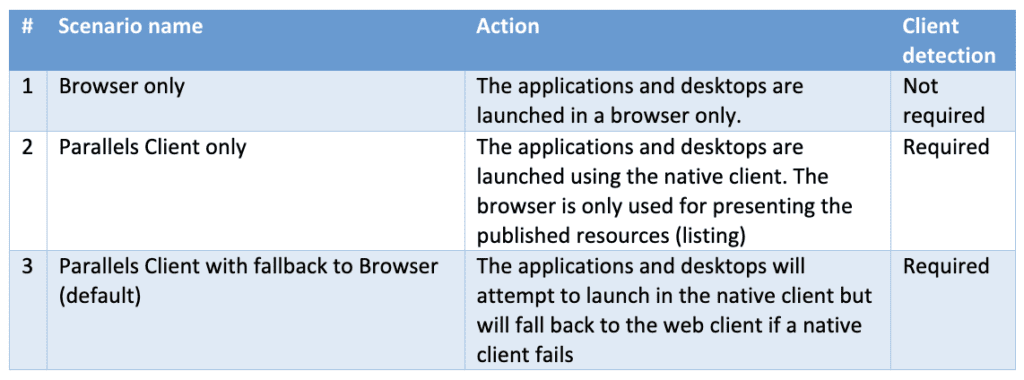
These settings can be enforced on a Secure Gateway level as well as on individual themes to allow for a more granular approach. The following scenarios describe the user experience associated with three different approaches:
Scenario 1: Browser only
In this scenario, the admin has specified to only allow the web client when using the User Portal.
When a user logs on to the User Portal the client detection process will not be triggered.
When launching published resources, the Web Client will always be used. The option to manually download the client is still available in this scenario. As a result, an end user can still install the Parallels Client, but it will not affect the way applications and desktops are launched using the User Portal. When using the Browser only, users do not need to install anything on their devices which makes it ideal for Bring Your Own Device (BYOD) scenarios and unmanaged device access.
Scenario 2: Parallels Client only
In this scenario, the admin has specified to only allow the Parallels native or platform-specific client when accessing the User Portal.
When a user logs on to the User Portal, the following dialog is shown to explain to the end user that the organization requires them to use the Parallels client. At this stage, the end-user has the option to either log out or initiate the client detection process.
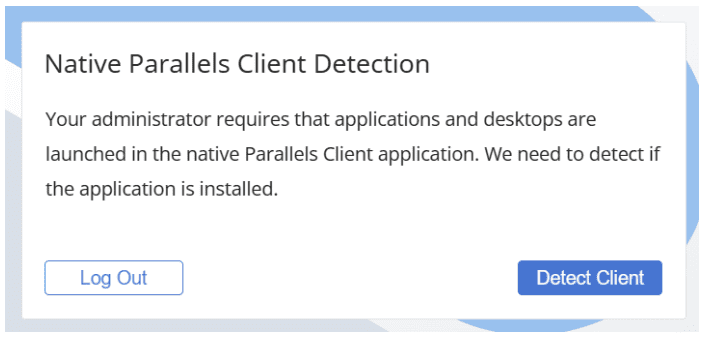
Upon clicking Detect client, the client detection process is started. In case a client is successfully detected no further action is needed and the App Launcher will appear. In case the detection is not successful the option to install the client and the dialog shown below appears.
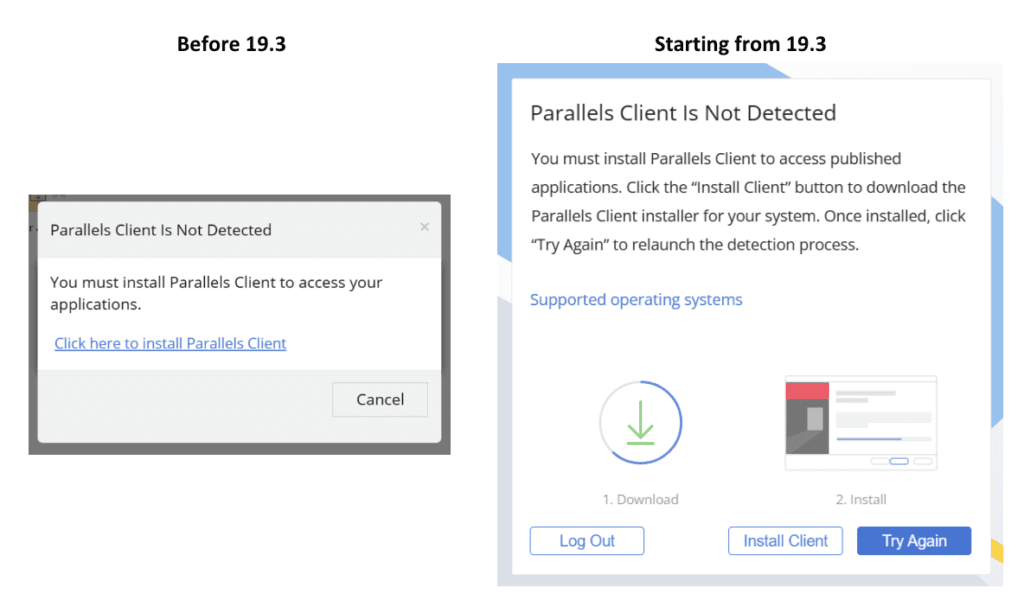
From here, the end-user has the option to log out, retry the detection process, or install the client.
Depending on the operating system, when the end user clicks Install Client a redirect is performed to the App Store associated with the operating system or, if they are using Windows, an executable clientdownloader.exe is downloaded.
When launched, it will guide the end-user by detecting the operating system and offering the installation options shown below. The subsequent installation steps are identical to the steps involved in manually installing the Parallels Client for Windows.
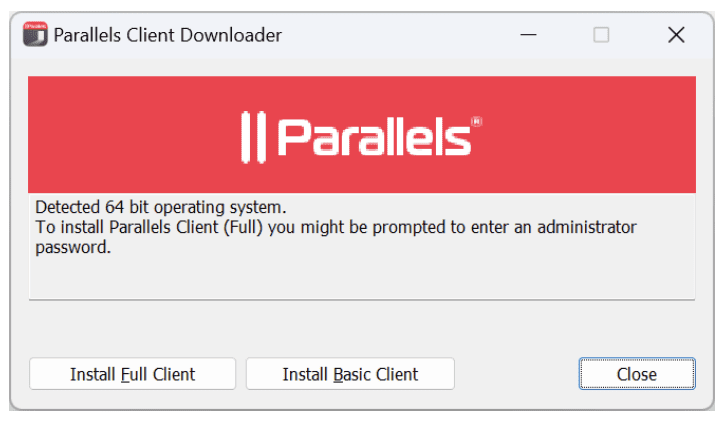
Once the installation is completed, the end user can click Try again to initiate and complete the detection process. The outcome of the detection should now be successful, and the end user will be presented with the App launcher.
Scenario 3: Parallels Client with Fallback to Browser
In this scenario, the admin has specified to use the Parallels native or platform-specific client when using the User Portal with the option to fall back to the web client. This is the default option for any Parallels RAS environment.
When a user logs on to the User Portal, the dialog below is shown, informing the user that it is recommended to use the Parallels Client. This recommendation dialog is a new addition in Parallels RAS 19.3.
The user now has the option to opt out of the detection and use the web browser or initiate the detection of the Parallels client. In this scenario, the Parallels native or platform-specific client will be tried first, but because of the ability to fallback to browser only, users do not necessarily need to install anything on their devices. This capability is ideal for Bring Your Own Device (BYOD) scenarios and unmanaged device access where installing the Parallels native or platform-specific client might not be desired or possible.
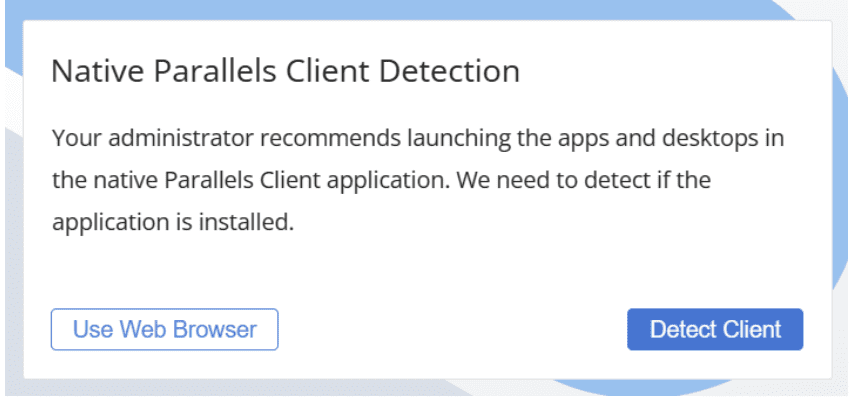
When the Web Browser is selected, the App Launcher appears, and published desktops and applications use the web client and users do not have to install the Parallels client. Upon any subsequent login, those users will continue to be presented with the dialog indicating the recommendation.
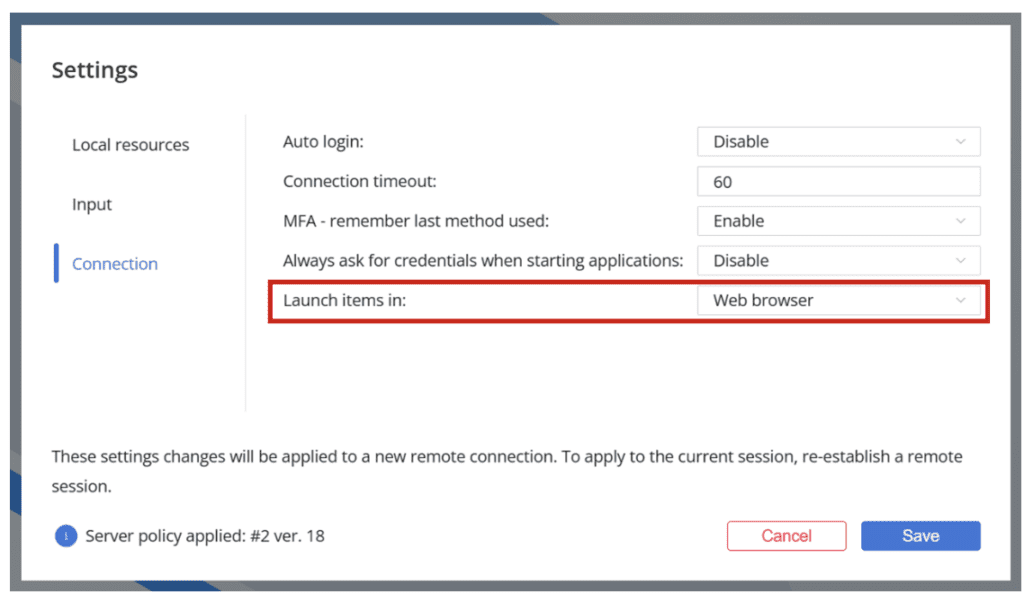
When selecting Detect Client, the same steps as outlined in the previous scenario will apply. The user is redirected to install the Parallels Client. A new option “Launch items in” is also available in Settings.
This gives the user the ability to choose the default behavior when an administrator configures fallback mode. Users can have the client detected but still opt to launch inside the browser by default.
Modern user interface with lighter colors and styles
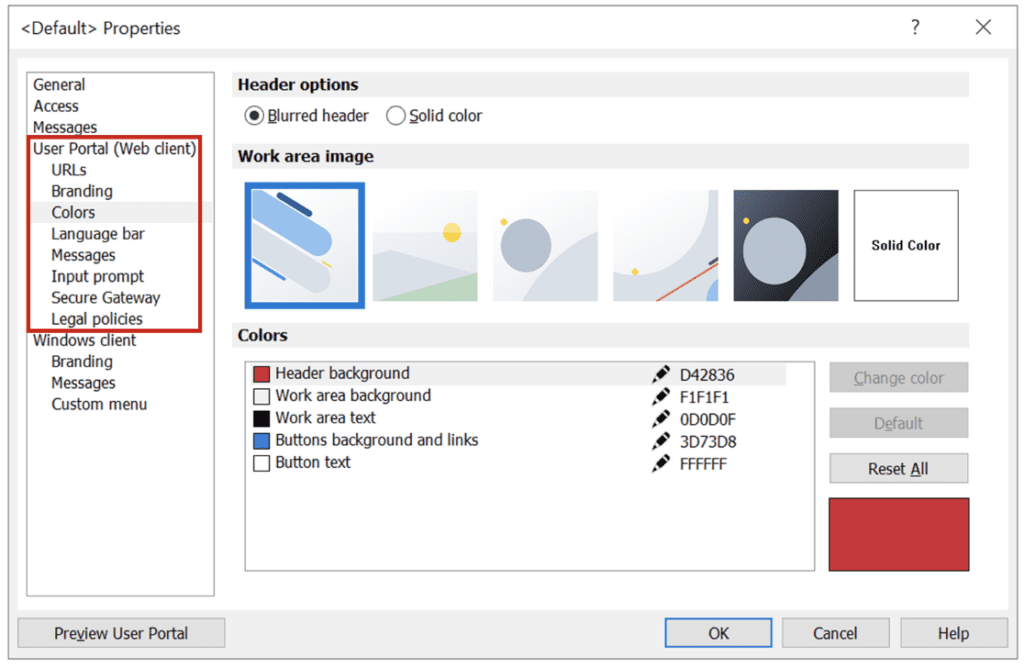
The new User Portal interface offers a modern look and feel with light colors. Like before, organizations can still choose to customize the look and feel of the User Portal to align with their own branding.
To add branding or otherwise white label the User Portal, open the Parallels RAS Console, Open the Sites section, and click Themes. This is where you can edit the current theme or create multiple other themes.
When editing the theme, use the sections highlighted below to customize the User Portal by changing text, colors, background, and much more. Changing the Work image area is included in Parallels RAS version 19.3.
Discover the new User Portal for yourself!
Starting with version 19.3, Parallels RAS offers a brand-new User Portal interface. This new version brings a modern look and feel to the portal you already know and love, along with other enhanced capabilities. It uses modern web technologies to provide a more intuitive user interface while still allowing organizations to add custom branding.
Users accessing the User Portal will be presented with the new interface immediately after Parallels RAS is updated to 19.3.
Use this direct link to join the technical preview and get early access to new features and improvements included in the upcoming Parallels RAS 19.3 release, stay tuned for general availability, and visit the what’s new page.
Note that minor user interface changes can be expected before general availability.
For more detailed information on administrating Parallels RAS follow the admin guide.
Ready to discover how Parallels RAS can transform your end users’ experience? Access the free trial now!

