

How to lock the screen on a Mac
If you own a Mac, you have probably used it for work or play outside your home at least once.
You might have left your laptop on a desk or table unattended while taking a break, thinking, “What’s the worst that can happen? No one knows my password.”
If you recognize this scenario—this blog is for you.
Simply shutting down your computer or closing your laptop screen is not enough to keep your Mac safe from passersby.
However, using the Mac lock screen feature is.
The Mac lock screen feature is a security measure that allows you to lock your Mac down so others cannot access your files, applications, and data when you step away from your laptop.
Keep your Mac safe with Parallels Desktop. Get your 14-day free trial today.
Why would you need to lock the screen on a Mac?
Improving the security of your Mac, including the data and files stored on it, is the main reason why you need to lock the screen.
Here are some scenarios where using the lock screen can be especially beneficial…
Protecting sensitive files or data when using your computer in a public place or shared setting
If you’re working in a public place, a shared office, or anywhere other people may access your laptop, a lock screen is highly recommended.
When you lock the screen on your Mac, it prevents prying eyes from accessing your data and files if you step away and leave your laptop behind.
Avoiding disruptions in your workflow
If you step away from your desk to take a call or grab a coffee, locking your screen can help prevent unauthorized access that might disrupt your workflow.
If you leave your Mac unattended without a lock screen enabled, people can modify your work, close applications or interfere with your progress while you’re away.
Interruptions like these can impact your productivity and cause errors in your work, which is why using a lock screen is an important precaution when using your Mac for work.
Troubleshooting technical issues
If you’re experiencing technical issues that you want to troubleshoot, you may need to take screenshots or screen recordings to show the problem.
Because you may take screenshots of sensitive information for troubleshooting, you don’t want others to be able to peep at those details if you step away from your Mac.
Locking your screen prevents that from happening.
Depending on the tool, locking your screen during a remote support session also ensures that the session remains private.
Ensuring compliance with company policies
It could be that your organization simply mandates employees to lock their screens when away from their desks.
They can require this based on the security it provides in the abovementioned scenarios.
How to lock the screen on a Mac
There are a couple of ways to activate the lock screen on your Mac. Here’s how to do it.
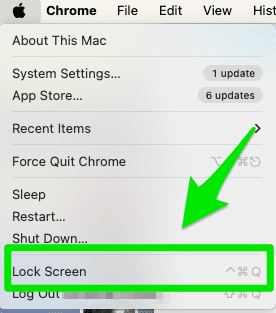
1. Using the Apple menu option
Access the Mac lock screen shortcut by clicking the Apple icon.
Select “Lock Screen” on the dropdown menu. The login window will automatically appear on display.
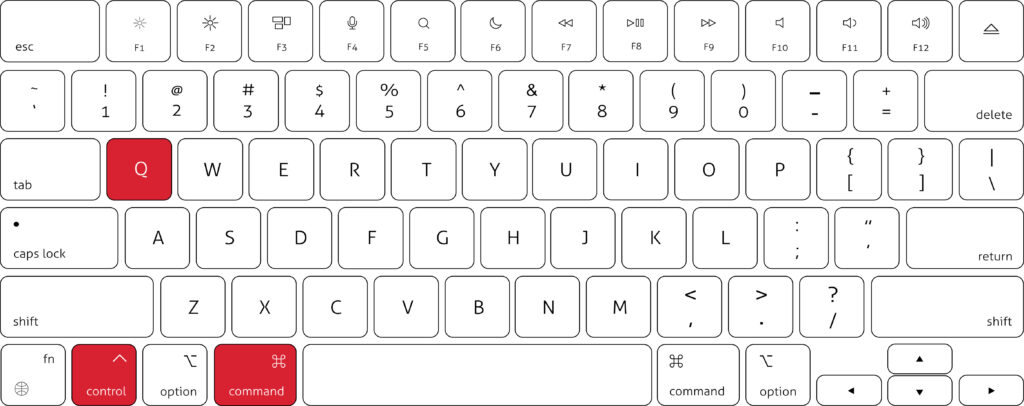
2. Using the keyboard
Press and hold Command, Control, and Q simultaneously. That will automatically lock your screen.
How to lock the screen on a Mac with Parallels Desktop
To set up lock screen on your Mac using Parallels software, follow these steps:
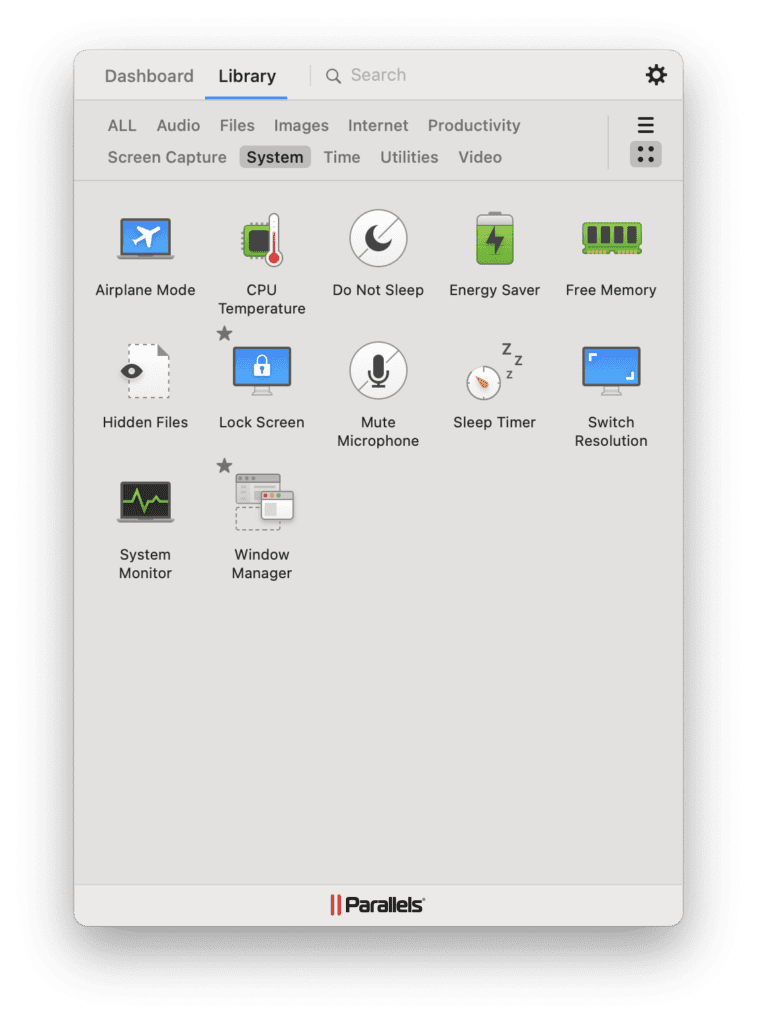
1. Launch the Parallels Toolbox, and navigate to the “Library” tab.
2. Select “System” located above the menu list.
3. Choose “Lock Screen”, and the login window will immediately appear on the screen.
How to lock the screen on a Windows virtual machine on a Mac with Parallels Desktop
You can still use the lock screen feature if you’re working on a Mac in a Windows environment through Parallels Desktop.
There are three ways to turn on Windows lock screen on your laptop:
1. Using the keyboard shortcuts
Method 1: Press the Command key and the L key simultaneously to activate the lock screen.
Method 2: Hold down Ctrl, Option, and Del simultaneously. Several options will be displayed on the screen. Press “Lock” to activate the lock screen.
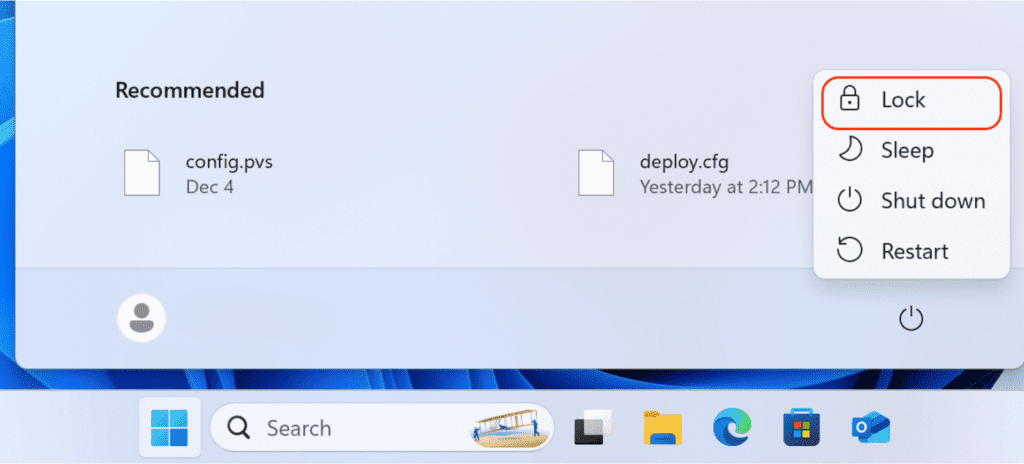
2. Using the “Start Menu”
Start by clicking the “Start Menu”.
Continue to the power button where a menu will pop up. From there, choose “Lock” on the menu list.
How does the lock screen capability protect my Mac?
Locking the screen on your Mac is an important security measure that helps protect your data and privacy.
Here are some reasons why this capability enhances your Mac security:
Password protection
When using the lock screen feature, you will be prompted to enter a password or verify through another authentication method to gain access.
This requirement prevents users other than yourself from accessing your files, applications, and personal information if you step away from your Mac.
Screen saver
When you turn on lockscreen on a Mac, it adds an extra layer of security. When you’re inactive, the screen saver will activate and lock your Mac automatically.
That helps protect your data if you forget to manually lock your screen when you step away.
Lock screen settings
Customizing your lock screen settings lets you control how and when your Mac locks.
You can set a specific time interval for automatic locking or require a password immediately after the screen saver starts.
These settings ensure that your Mac is always protected according to your preferences.
Remote locking
If your Mac is lost or stolen, you can secure it by remote locking.
Services like “Find My” allow you to lock your Mac remotely, preventing anyone from accessing your data.
Custom message
Adding a custom message to your lock screen can be helpful in case your Mac is lost.
This message can include contact information or instructions for returning the device.
While this doesn’t directly improve security, it can be a helping hand in the recovery of your Mac and ensure that it is returned to you safely.
Why should I use a password to protect my Mac?
When you lock your screen, it requires a password or other authentication method to regain access.
This requirement prevents unauthorized users from accessing your files, applications, and personal information.
Make sure that the password your Mac prompts you to enter on the lock screen is strong to enhance your security even more.
Here are some additional steps to further protect your Mac:
Protect multiple users
If your Mac is used by several people, creating separate user accounts for each person is recommended.
In that way, others cannot access your information or files when using the same Mac.
Turn off automatic login
By requiring a password to be entered at every login, you minimize the risk of unauthorized access, as no one will automatically be logged in.
You can turn this feature off in the “Users & Group” settings.
Use two-factor authentication
In the event of your password being leaked, two-factor authentication can help protect your Apple ID, as entering the password won’t be enough for someone to be able to login.
Use a password manager
Creating and storing strong passwords becomes simple with a password manager.
It helps you maintain your Mac’s security by reducing the risk of using and reusing weak passwords across your accounts and applications.
Use a VPN
A VPN encrypts your internet traffic and keeps your IP address anonymous, which protects your data when you use public Wi-Fi or other unsecured networks.
As such, your sensitive information, such as passwords and browsing activity, is kept private and safe.
Avoid downloading software from unknown sources
To avoid downloading malware, only choose downloads from registered developers.
That is the only way to be certain that you can trust the sender and what the download contains.
Use “Find My Mac”
If your Mac gets stolen or lost, “Find My Mac” can help you remotely lock it.
That means even if someone else gets a hold of your laptop, they can’t get access to your files and applications.
How do I set up a password to lock the screen of my Mac?
Have I convinced you that setting up a password to lock your screen is a good idea?
Great! Here’s how you do it.
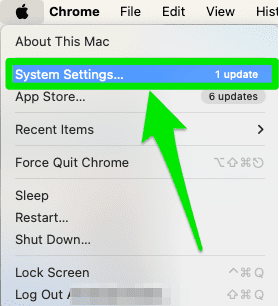
1. Open “System Settings”
Click on the Apple menu in the top-left corner of your screen. Select “System Settings” from the dropdown menu.
2. Go to “Lock screen”
In the “System Settings” window, click on “Lock screen.”
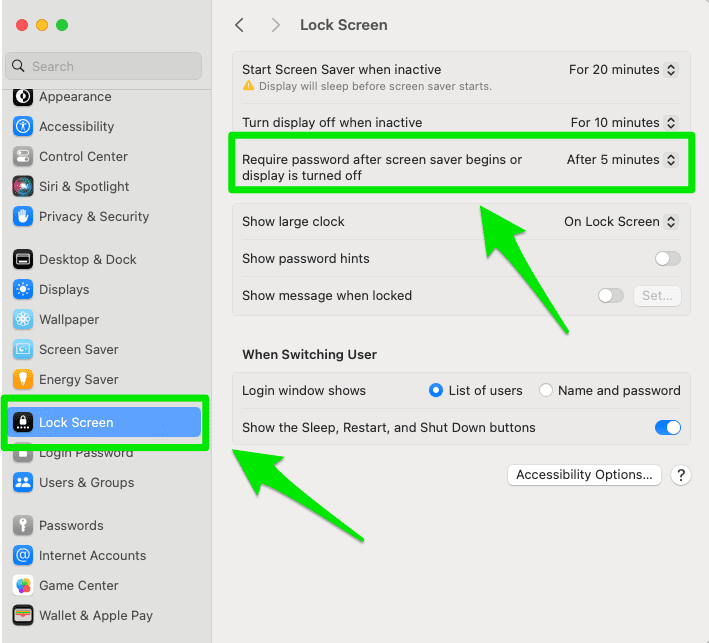
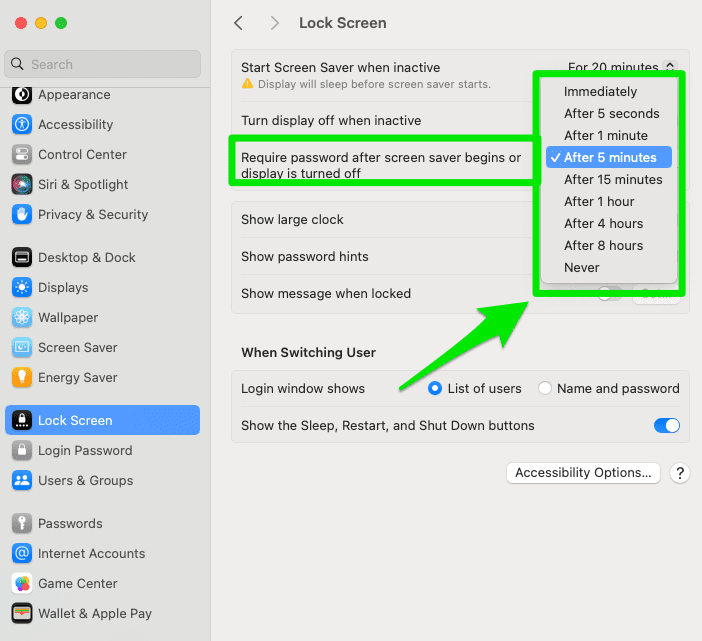
3. Select “Require password after screen saver begins or display is turned off”
Under the “Lock Screen” tab, click on “Require password after screen saver begins or display is turned off.”
Choose the time interval for when the password is required (e.g., immediately, 5 seconds, 1 minute).
4. Test your settings
Activate your screen saver or put your Mac to sleep. Wake your Mac and ensure that it prompts you for the password you set.
Put yourself at ease by turning your Mac screen to sleep with Parallels Desktop
Using the lock screen feature keeps your Mac safe.
This process includes choosing a strong password, disabling automatic login, activating two-factor authentication, and Find My Mac.
When paired with Parallels Desktop, you can maximize your Mac’s security without sacrificing the user experience.
Parallels Desktop provides a smooth and secure way to switch between platforms or access work tools while keeping your data safe.
Try it for free for 14 days and experience the enhanced security first-hand.